Creating Our Business Process
A high-level summary on how a process works
There are two terms that we’d ought to familiarise ourselves with here. One being process definition, and the other process instance. Currently, we are creating a process definition, which can be thought of as a base blueprint for a process instance. There can be multiple process instances, which are created(or more properly-termed ‘instantiated’) when the employee wants to submit a request. Each instance is different from the other and may end with varying results. This is primarily reliant on differences in process variables that are defined by user input(like our
employeeandrequestvariable that needs to be filled up by the requester) as well as outputs from functions executed along the flow.
Now, we shall design the business process and define its flow. Because this is a demo application, we’ll keep things simple instead of creating overwhelmingly complex processes.
Scenario Reference
In our portal, we’ll have an actor who submits a request, groups of actors who process the request and a final actor who decides whether the request is approved or not. Ultimately, all of these actors are employees, so that can be declared as an object in and of itself. Then, we also have the request object, which should contain information about the request made by the first actor.
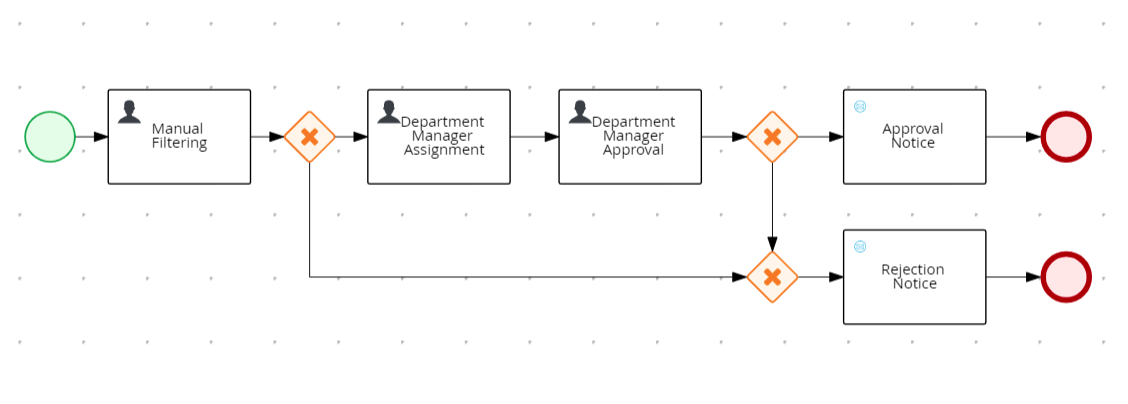
Our goal now is to turn the above thoughts into action. Let’s start off by adding a new business process asset to the project and naming it ‘request-portal’. Below is a reference image and a teaser for what our business process will look like at the end of the day.
Submission Stage
From the above scenario reference, we know that our process involves these three stages: submission, processing, and a final approval. To represent submission(i.e the start of the process), we will drag a start node(the plain green circle) into our editor space.
Processing Stages
Now, in the processing stage, we can break it down into two sub-stages: manual filtering by Processing Officers, and the assignment of the appropriate department manager by a Human Resources team.
Creating our user task nodes
Since these are tasks assigned to human users, let’s click on the Activities button(which can be identified by a plain rounded rectangle on the menu of nodes on the left) and drag in a User node. Then we connect the start node to it. Nodes can be connected together by clicking on the preceding node, selecting the solid arrow icon, and dragging it towards the following node. Click on the User node and edit its name to “Manual Filtering” in the Properties window on the right.
If there doesn’t appear to be any window, click on the pencil-paper icon in the upper-right corner to expand it.
Then, we drag in another User node, and we then name it “Department Manager Assignment”.
Implementing conditions with a BPMN gateway
Before connecting the two, we need a BPMN(Business Process Model and Notation) gateway, which can be thought of as a logic gate that helps us implement control flow in our process. This gateway is needed to split our results into two cases based on the output of the Manual Filtering sub-stage. One being an approval from Processing Officers where it will lead to the next sub-stage(assignment of department manager), and another where it is rejected, and leads to an early-ending and a notice email of rejection to the employee. A list of gateways and what they generally perform can be found here.
Let’s click on the Gateways button(orange rhombus) and drag an “Exclusive” gateway in between our two task nodes. Expand the properties window and name it “Processing Officer Decision”, and connect the Manual Filtering node to our gateway. The gateway should then branch out into two paths, but for now, we’ll just connect it to our Department Manager Assignment node.
Creating our process variables
Now, we need to define a condition for when the gateway should allow the flow to pass through this branch. We know our condition is that the Processing Officer has to approve of the validity of our request in order for it to pass. Therefore to evaluate this, we need some variable that indicates whether the Processing Officers approve of it or not. This is where process variables come into play.
In order to edit process variables, click on the upper right pencil-paper icon to edit the properties of our process.
Note: If you can’t see any process properties
Ensure that you haven’t selected any nodes, otherwise it’d display the properties of that node instead of the process properties. To de-select a node, just click on any empty space.
Then, scroll down and click on Process Data to expand the list, and there we can edit our process variables. Process variables are variables that we need to keep track of globally throughout the execution of the process.
Configuring our Manual Filtering node
In order to indicate whether the Processing Officer has accepted it, we can create a variable of type boolean named hasBeenValidated. The value of this variable will be decided by Processing Officers in the Manual Filtering task node.
Our user task node can be thought of as a manually-driven function. In order to output something, our Processing Officers will need some input parameters to base their output decision on. This will of course be the employee object and the request object. They need to know who exactly made the request, and the details of their request in order to validate it. Therefore, we shall establish these as process variables as well.
Add another variable named employee of data type Employee which represents the employee who submitted the request. Then, add another variable named request of data type Request, which represents the request the employee has submitted. At the end of the day, these two variables will be filled up in a form by the employee looking to submit a request to work from home.
Now, click on our Manual Filtering node, and expand Implementation/Execution. Fill in the following details:
- Task Name:
manualFiltering - Subject:
Conduct manual filtering for #{employee.name}'s request- Any content written in
#{}is treated as a FEEL(Friendly Enough Expression Language) statement. In this case, this statement will refer to our employee process variable and itsnamefield, which is a field we established when we created the Employee data object. So if the employee’s name is James,#{employee.name}will be replaced with ‘James’.
- Any content written in
- Groups: ManualFilters
- This is where groups come into play. We can assign our user task to groups of users or even specific actors with the above Actors tab.
- Assignments:
- Data Inputs And Assignments(These are the input parameters given to our Processing Officers, who are part of the ManualFilters group):
- Name:
employee; Data Type:com.myspace.wfhrequest_portal.Employee; Source:employee - Name:
request; Data Type:com.myspace.wfhrequest_portal.Request; Source:request
- Name:
- Data Outputs And Assignments(This is the output decision that will be manually filled by our Processing Officer)
- Name:
hasBeenValidated; Data Type:Boolean; Source:hasBeenValidated
- Name:
- Data Inputs And Assignments(These are the input parameters given to our Processing Officers, who are part of the ManualFilters group):
Configuring our Department Manager Assigment node
Then, add another variable named manager of type String, which will be the output of our Department Manager Assignment task node. The value of this process variable will be assigned by the Human Resources team, who will find the employee’s department manager and tell jBPM which user the final task should be assigned to.
Click on the Department Manager Assignment node, and expand Implementation/Execution. Fill in the following details:
- Task Name:
managerAssignment - Subject:
Assign the appropriate department manager - Groups: HR
- Assignments:
- Data Inputs And Assignments(No request object because HR doesn’t need to know request details):
- Name:
employee; Data Type:com.myspace.wfhrequest_portal.Employee; Source:employee
- Name:
- Data Outputs And Assignments
- Name:
manager; Data Type:String; Source:manager
- Name:
- Data Inputs And Assignments(No request object because HR doesn’t need to know request details):
Last process variable
Lastly, add another process variable named hasBeenApproved, which is a Boolean that indicates whether the request has been approved by the department manager and ultimately decides whether the request is granted.
Connecting our BPMN gateway and task nodes
Finally, connect our Manual Filtering node to our exclusive gateway, and connect the gateway to our Department Manager Assignment node. Then, click on the arrow leading from the gateway to our Department Manager Assignment node, and open Implementation/Execution. Change the condition expression to Expression and add this statement into the field: hasBeenValidated = true. Now, this path will only be open when the condition is met. We will handle the opposite case for when the Processing Officer rejects it later on.
Creating and configuring our final approval task node
Now, again, add a new user task node and name it “Department Manager Approval”. Connect the Department Manager Assignment node to our new node, and click on our new node. Again, expand Implementation/Execution and enter the following details: Task Name: approveRequest Subject: Approve the work from home request Actors:
#{manager}- This statement gets the value of our
managerprocess variable and so assigns the task to the manager as specified by our HR team.
- This statement gets the value of our
wbadmin- We do this because our application that uses jBPM’s REST API requires authentication to complete a user’s reserved task(task that it reserved for that specific user, just like our manager and the approval task), but for security reasons and the way we hash account passwords, we cannot access the manager’s credentials.
- Therefore, we create a workaround by establishing a system account for all authentication, and also assign reserved tasks to them in order for the task to be completed through authentication from our system account.
- We shall establish
wbadminas our system account.
- Assignments:
- Data Inputs And Assignments:
- Name:
employee; Data Type:com.myspace.wfhrequest_portal.Employee; Source:employee - Name:
request; Data Type:com.myspace.wfhrequest_portal.Request; Source:request
- Name:
- Data Outputs And Assignments
- Name:
hasBeenApproved; Data Type:Boolean; Source:hasBeenApproved
- Name:
- Data Inputs And Assignments:
Creating a new custom task
jBPM enables us to create our own custom task, one of which includes an automated email task. All we need to do is set up a SMTP server or in our case, we’ll use a SMTP hosting service. We will be using an email delivery service called Elastic Email.
First, create an account and log into it. You’ll have to then perform a simple account verification. After that, click on settings, and click on Create SMTP credentials. This will allow us to create new credentials on their domain. Enter your desired email, and click on “Create”. A window will pop up displaying your SMTP credentials. Ensure that you note the provided password down as you’ll only see it once.
Now, hop on back to Business Central, head to your project explorer(where you can view all your projects’s assets) and click on the “Settings” tab. Click on “Custom Tasks”, and install the email functionality. Enter the parameters according to what Elastic Email has given you and click Install. Now, if you head back to the project explorer, you will see a new asset called Email. Once you’ve verified that, dive back into our business process asset.
Finishing touches: connecting all our nodes
Now, connect our Department Manager Approval node to a new exclusive gateway, and name it “Department Manager Decision”. This exclusive gateway will determine the path of the process based on the value of hasBeenApproved.
If it is true, it will lead to our custom email task where we email the employee and let them know that their request has been approved.
If it is false, it will let them know that their request has been rejected.
These tasks will be known as Approval Notice and Rejection Notice. Now, click on the Custom Tasks(icon of cogs) button to add our new custom email task to the editorial space. Name it Approval Notice. Then, connect the new exclusive gateway to our new custom task, click on the arrow, and add the following expression: hasBeenApproved = true and hasBeenValidated = true. Now the approval email will only be sent when both Processing Officers and Department Manager approve of the request. Finally, add an End node and connect the custom task to it to signify the end of the process.
For now, we know that our process can be led to Rejection Notice from two paths.
- From the rejection of Processing Officers at the start
- The approval of Processing Officers at the start but the rejection of the Department Manager in the end. To combine these two paths, we shall create another exclusive gateway just to organise these two paths into one that leads to the same result. Now, place a new exclusive gateway, and connect our Department Manager Decision gateway to it. Click on the arrow, and add the condition:
hasBeenApproved = false or hasBeenValidated = false. Lastly, also connect our “Processing Officer Decision” gateway to the same gateway. Click on the arrow, and add the conditionhasBeenValidated = false.
Add a new custom email task and name it Rejection Notice. Finally, connect our new gateway to this node and connect the email task to another end node. At last, our work for the business process is finished and we can save it.